Thursday, June 2, 2016

Lighting for East Oakdale Section

As I mentioned in a previous post, I was not able to light this layout section with blue rope lighting to achieve the "night lighting" effect.  My solution was to purchase (Ace Hardware) three individual screw-in light bulb type lighting fixtures.  I then had to figure out how to wire them to a switch and route power to them.

As I am no electrician, I turned to YouTube to see how to do this.  I found a fellow model railroader who did a similar electrical project and filmed how he did it.  Basically, this guy used a grounded electrical cord as a basis for his project.  So, I did the same thing.  I bought an electrical cord, a blue plastic electrical box and a standard wall switch.

I cut off the female end plug of the electrical cord which gave me access to the three inner wires.  I connected one wire to one lead of the light fixtures in series and the other wire to the wall switch and then to the second lead of the light fixtures.  I attached the ground wire to a grounding point.  All of the electrical connections were done with a soldering iron and then covered with heat-shrink tubing.  After the connections were made, I plugged in the male plug of the electrical cord into a power surge outlet.  I flipped the switch on and to my delight; the three light fixtures illuminated with blue light.

*** Special Note ***
 
THIS METHOD IS NOT ACCORDING TO THE ELECTRICAL CODE


Switch and Electrical Box

Electrical Box Installed in Frame


Framing for lighting valance and light fixture installation:

Appropriate Size Hole Drilled in Frame for Light Fixture 

Light Fixture Installed in Frame
 
Light Fixture Fits Flush Against Frame
 
Electrical Cord Connections to Light Fixtures:
 
 
Orange Electrical Cord and Wire Leads for Fixtures
 
Electrical Cord Connected to Terminal Block


Light switch installed in Fascia:
 
Close-up of Light Switch
 
Switch Next to Control Panel
 
Completed framing of East Oakdale:
 
East Oakdale Section with Night Lighting (Behind Clock)


East Oakdale Framing

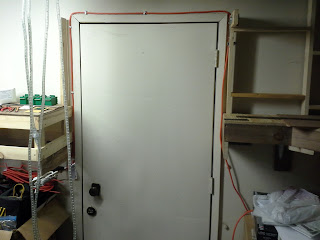
Several months ago, I decided to start construction of the layout extension going from the Sierra side of Oakdale Junction to the SP Merced staging yard and Sierra's Jamestown staging yard.  Once again, I used 1X3 boards purchased from Lowes for the open grid frame and 1/2 inch plywood for the top.  This small section fits the area from the main layout (near the meat packing complex) to the edge of the doorframe of the door leading out of the garage to the side yard.


Door Leading Out to the Side Yard

Unlike the Farmington section, I did build this section with a backdrop and an overhead lighting valance.  I also included a way to light the section with "night lighting."  Due to the small size of the section, I was not able to use the blue rope lighting that I am using on the longer sections of the layout.  Instead, I installed three individual light bulb fixtures (blue bulbs) and a standard on/off wall switch to turn them on. (Details of this will be in a separate post.)

This section is where the SP tracks leading to Merced (staging) and the Sierra tracks leading to Jamestown (staging) converge for a short distance.  I had to do this in order to make my track plan work for the operations I have planned to run my layout.  After converging, the tracks split apart prior to crossing a removable access bridge leading to the rest of the layout (Merced and Jamestown).

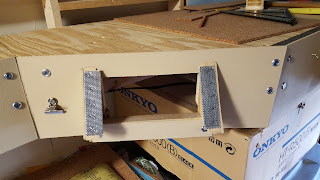
Though the majority of the turnouts on the layout are controlled by Caboose Industries ground throws, this section has two turnouts controlled by slow motion Tortoise Switch Machines.  A small control panel is affixed to the fascia of this section.  There are two toggle switches in the panel to control the turnouts and red/green LED indicator lights for throw direction.   The sections of track will also be monitored with NCE BD Block Detectors and will light an orange LED indicator light on the control panel.
Location of Control Panel

Sierra Railroad Enginehouse

I recently put together the two stall enginehouse from Pikestuff.  This structure is my representation of the Sierra Railroad's two stall enginehouse located in Sierra Yard in Oakdale.  I painted the exterior of the kit a light mint green color and the roof white.  These were chosen based upon old photographs I had seen on the internet.  I have to build up a base for the structure and figure out a way to add interior lighting.


Wednesday, June 1, 2016

Farmington - Dirt Road and Gas Station Placement

Once I had the overall track plan for the Farmington section planned out, I then decided on where the dirt road and gas station were going to be located.  I cut a cork pad and laid out the general path for the dirt road and used more of the cork pad for the footprint of the gas station.  The gas station is a white metal kit from Woodland Scenics.  My father actually put the kit together several years ago when he had an HO scale layout based on the Sierra Railroad and the Pickering Lumber Company.

Cork Pads for Dirt Road and Gas Station

Test Fitting Gas Station Scene

My father's layout was a shelf style layout that took up an entire wall of the two car garage.  I remember running this layout when I was in high school.  The layout ran on a stationary DC power pack with several blocks for multiple train operation (DCC was just beginning to grow back then).  The layout was set back in the 20's and 30's and ran from the town of Standard up a switchback through the mountains to the logging camps.

My favorite trains to run were his Shays and Heislers.  My father had a roundhouse 2-truck Shay, a Bachmann Spectrum 3-truck Shay, a Rivarossi 2-Truck Heisler and a Rivarossi 3-truck Heisler.  These four geared steam locomotives were lettered for the Pickering Lumber Company.

That layout is long gone now and my father has converted over to Lionel.  Fortunately for me, he gave these locomotives to me along with a lot of his other HO scale items from that layout.  Of course, I am not going to be running those Shays and Heislers on my layout.  The two Shays at least have plugs for a DCC decoder, but I do not know how to convert those older style Heislers he got back in the 70's/80's.

I'll have to get theses locomotives out of the storage box I have them in and take pictures for a future post on this blog.

"Bridge" Main Layout to Stockton Staging

I needed a short, sturdy and removable access bridge to go from the SP side of Oakdale Junction to the Farmington section so that the SP trains could get to the Stockton Yard (Staging).  I used 1x3 boards and a plywood top to make a three foot long "bridge."  To prevent trains from crashing about five feet to the concrete slab of the garage floor, I attached 1/8 inch Medium Density Fiber (MDF) board to each side.  The "back side" is about six inches in height and will be painted in a "sky blue" color.  The "front side" is about three and a half inches in height and is painted in the light tan color used on the layout fascia.

Access Bridge without MDF Board

Access Bridge Attached to SP Side of Oakdale Junction


To assist family members and train operators from possible injury while walking in the immediate area when the "bridge" is in place, I painted the outside of the larger MDF board and the supporting wooden ends a bright yellow color.  I then attached "CAUTION" using black stick on letters I purchased at a craft store (Michael's).

Bright Yellow Paint Applied to Danger Areas

"CAUTION" Applied to Access Bridge


The access bridge is held in place and keeps the tracks aligned with carriage bolts and washers (a total of four - two on each side).

Framing for Farmington Section of Layout

The framing for the extension to Farmington was made using open grid bench work with 1X3 boards I bought at Lowes.  I used 1/2 inch plywood as the base and will use cork roadbed strips on top of the plywood for the area where the track will go.  Since this section is really just a means to get to the SP Stockton Yard (Staging), I did not build it with an overhead lighting valance like the other parts of my layout.

Wood Framing for Farmington Section and Metal Shelving for Stereo System


I had a medium sized stereo system that I wanted to place in my garage.  The area above the Farmington section had plenty of wall space, so I wanted to utilize it.  I used a metal rail shelving system for this and the shelf I used to hold the stereo covered most of the Farmington section.  I therefore used two small fluorescent under cabinet lights (purchased at Walmart) to light the Farmington section.  However, this section will not have a "night lighting" option as with the other portions of the layout.

Stereo System on Shelf Above Farmington

View of White Metal Shelving System I Used

Fluorescent Light

New Addition to Layout - Farmington

I recently expanded my layout to include the extension to the location of where Southern Pacific's Stockton Yard (Stockton Staging) is going to be.  This segment is comprised of a small removable access bridge between the SP side of Oakdale Junction and the area of Farmington.  This bridge is approximately three feet in length and is removable so that easy access can be made into the walking areas of the garage.

Farmington Section

The next portion is of the small rural community of Farmington.  The Farmington section is built on a wood frame that is about two feet wide and four feet long.  There is a switch that leads to a relatively short siding.  As of this post, I have not decided on which industry should be located at this siding.  I am leaning toward a small stock yard that has spots for two stock cars.  There is going to be a dirt road going across the main line.  There will be a small gas station, a church and a general store.  In the background there will be a farm house and windmill.

After Farmington, the track curves toward the right and SP trains will enter the staging yard representing Stockton.  This yard will have five staging tracks to hold the various SP trains I plan to run over the layout during operating sessions.

I used two photo backdrops of a tree covered hill depicting a fall scene for the Farmington section.